Clipper Mini-site Protocol Documentation
The purpose of this document is to take some of the guesswork out of configuring new sites at such addresses as http://subdomain.clipperdist.com
How to set up a new mini-site
In this section, you will find the steps you should take to avoid pitfalls. Server configuration and DNS records have many “gotchas” so follow the path laid here and you’ll never need to deal with conflicts and other issues.
First, you’ll configure the server so your files can be exposed to the internet. Currently your hosting provider is HostGator.
Then, you’ll set up the needed DNS records for the domain name at the domain name registrar so that browsers can direct traffic to your server and access the site files. Your domain name registrar is currently GoDaddy.
Step 1: Configuring the server
The server holds a lot of folders, files, and databases. You need to set aside a special folder to act as the destination for a browser to load your mini-site from. To do so, you need to configure a “subdomain.”
A subdomain is a second website with its own unique content, but there is no new domain name. Instead, you use an existing domain name and change the www to another name. The subdomain name looks like forums.domain.com, help.domain.com, help2.domain.com (assuming you already host domain.com).
The process of successfully creating a subdomain for a standard Clipper mini-site is as follows. When logged into HostGator:
- Click “Subdomains” on the “Domains” panel
- First, select “clipperdist.com” from the “Domain” drop-down field. Do this before entering your subdomain name in the field above. When the system generates the folder name for your site, it generates it with the domain selected in the drop-down. The default is clipperdist.net. You don’t want it to generate your mini-site’s new folder at that domain, so change it to clipperdist.com first.
- After selecting the correct domain, enter your site’s subdomain in the “Subdomain” field. This should be a single string of characters, with no spaces or punctuation, all lowercase. The results should look something like the screenshot below.
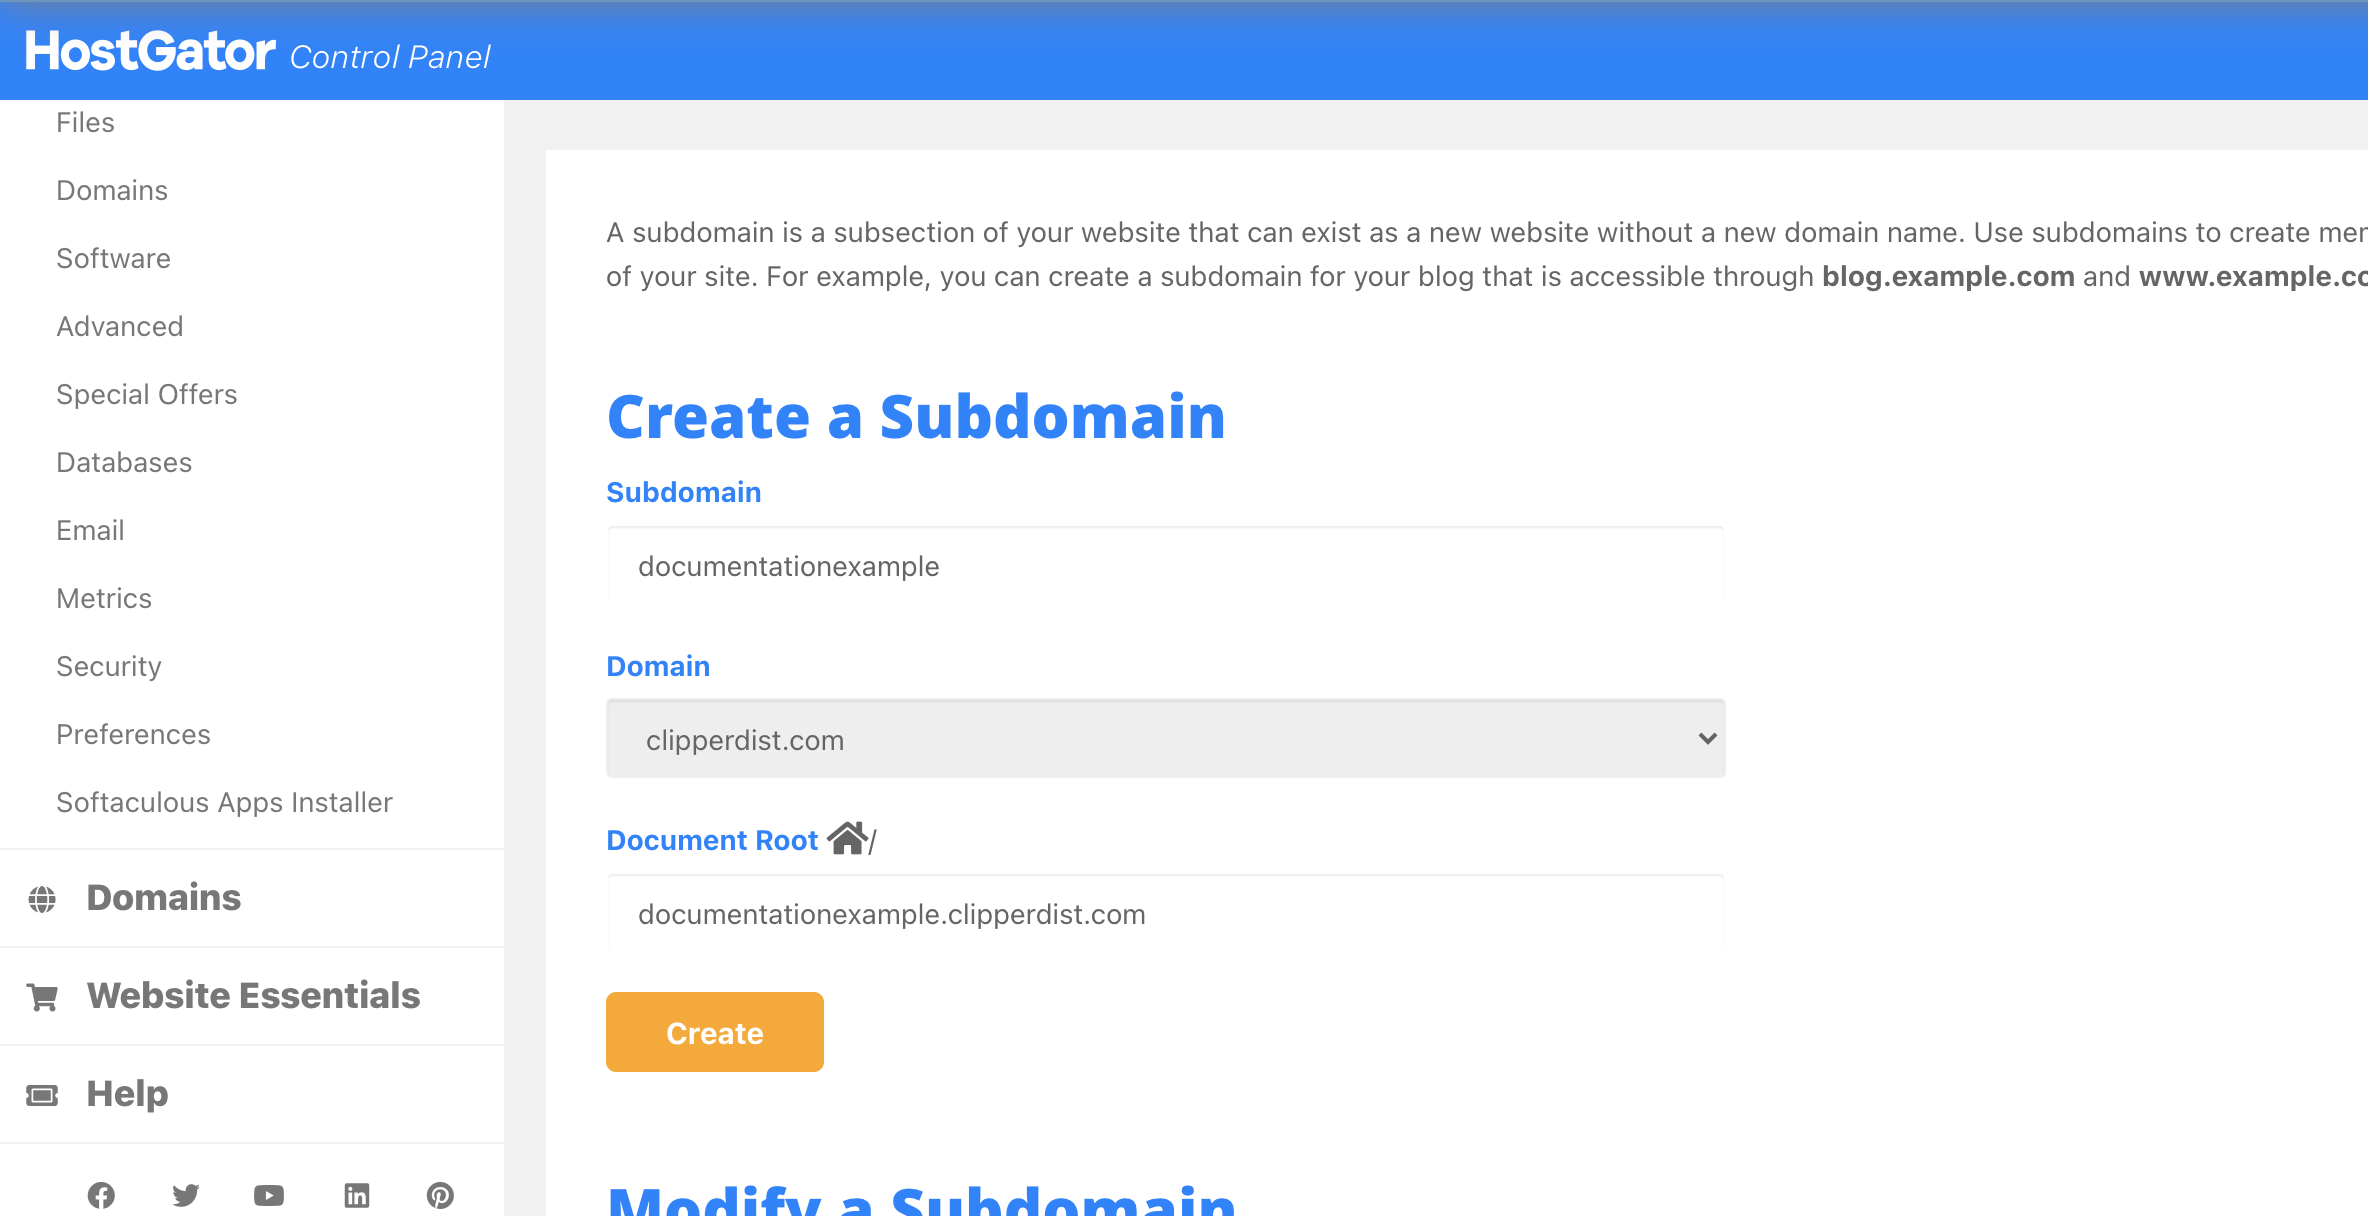
- Finally, click “Create.” You should be shown a green confirmation message announcing the successful creation of the subdomain.
You can now copy your files into the newly created folder using the “Files Manager” feature of HostGator’s control panel.
Step 2: Configuring the domain name
You need to tell your domain name about the existence of your new subdomain, or it won’t know where to send browser traffic. You do this by creating a record in the domain name system (DNS). These DNS records store two things primarily: The name of your subdomain, and the address of your server.
The address of your server is currently 162.144.12.158. That number is technically known as an internet protocol address, or IP address.
There are different types of DNS records, but you need only concern yourself with so-called “A-records” which are used when you need to point to an IP address directly.
The process for setting up a new record is as follows. When logged into GoDaddy:
- Clicked the “DNS” button for the “clipperdist.com” row
- Click the blue “Add” button at the bottom right of the DNS records table
- Configure the following settings. Where it says “subdomain” below, just enter the name of the subdomain you created on the server. In the case of the example screenshot above, it would be “documentationexample” without the quotes.
Type: A
Host: subdomain
Points to: 162.144.12.158
TTL: 1 Hour
- Click “Save”

At this point it may take up to 48-hours for the domain name settings to propagate through every DNS server in the world, but you can usually count on seeing the changes within a few hours of making the change. If you don’t, please wait the full 48 hours before assuming something has gone wrong. It sucks, but that’s how the internet was built and it’s the internet we have to live with at this point.
Step 3: Testing your site to confirm it works
The way to be sure the changes have taken effect is to successfully load a file from the server through the browser using the full URL of that file.
In the creation of this documentation we placed a simple text file on the server in the correct folder titled “jlsa.txt” that contains “Success!”
It can be pulled up in a browser at http://documentationexample.clipperdist.com/jlsa.txt
When the browser shows the content of the file, you know our work is done!